Are you ready to elevate your grilling game to a whole new level of deliciousness? Look no further than how to cook Ribs on a gas grill! Grilling ribs on the gas grill is an art that can transform tender cuts of meat into a mouthwatering feast. Whether you’re a seasoned grill master or a first-timer, this comprehensive guide will equip you with the knowledge and techniques needed to cook perfect ribs every time. Let’s fire up the grill and dive into the world of delectable, finger-licking ribs!
Why Trust Us?
Our expertise in grilling and culinary arts comes from years of hands-on experience and a passion for creating unforgettable meals. We are dedicated to providing you with reliable and well-researched information, following established consensus on scientific principles. Our mission is to cultivate trust by offering clear and accurate guidance for your grilling journey. So, let’s get started with the steps to cook the most succulent ribs on your gas grill!
Step 1: Selecting the Right Ribs
Begin your quest for perfection by choosing the right type of ribs. You’ll commonly find two varieties: baby back ribs and spare ribs. Baby back ribs are leaner and more tender, ideal for those who prefer a sweeter and milder taste. On the other hand, spare ribs are meatier and boast a rich, hearty flavor, perfect for those who love a smoky and robust experience. Both options are excellent; it’s just a matter of personal preference.
Step 2: Preparing the Ribs
To ensure a tantalizing result, it’s essential to prepare the ribs properly. Start by removing the thin, silvery membrane from the bone side of the rack. This step allows the flavors to penetrate the meat and prevents the ribs from becoming tough. Use a butter knife or your fingers to lift one corner of the membrane, then gently peel it off in one go.
Step 3: Seasoning to Perfection
Now comes the fun part – seasoning! Apply your favorite dry rub generously to both sides of the ribs. The dry rub can be store-bought or homemade, combining a symphony of spices like brown sugar, paprika, garlic powder, onion powder, salt, pepper, and any other secret ingredients you may have. The key here is to create a harmonious balance of flavors that complement the natural taste of the ribs.
Step 4: Preheating the Gas Grill
Before grilling, preheat your gas grill to medium heat. This step is crucial as it ensures even cooking and those beautiful grill marks that make ribs so appealing. Close the lid and let the grill heat up for about 10-15 minutes, giving you ample time to prepare any side dishes or barbecue sauces to accompany the ribs.
Step 5: Mastering the Two-Zone Grilling
Achieving perfection requires mastering the art of two-zone grilling. To do this, turn off one burner of your gas grill, creating a hot zone and a cool zone. Place the ribs over the cooler side, bone-side down, to allow the indirect heat to work its magic. This method prevents the ribs from charring and guarantees even cooking without drying out the meat.
Step 6: Adding Smoke Flavor (Optional)
For that irresistible smoky flavor, consider using wood chips or chunks. Soak them in water for about 30 minutes before grilling to prevent them from burning too quickly. Place the soaked wood chips in a smoker box or aluminum foil pouch, puncture some holes, and position it over the lit burner. Close the grill lid to let the ribs bathe in the aromatic smoke.
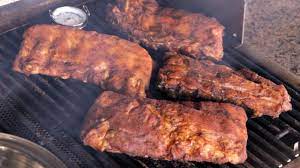
Step 7: Low and Slow Grilling
Now comes the secret to tender, fall-off-the-bone ribs – low and slow grilling. Maintain a consistent temperature of around 225°F to 250°F (107°C to 121°C) throughout the cooking process. Cooking time will vary depending on the type and thickness of the ribs, but a general rule of thumb is 2 to 3 hours.
Step 8: Basting and Glazing (Optional)
For an added layer of flavor, consider basting the ribs with your favorite barbecue sauce during the last 30 minutes of grilling. This step caramelizes the sauce, creating a tantalizing glaze that enhances the overall taste of the ribs. Be sure to apply the sauce sparingly to avoid overpowering the natural flavors.
Step 9: The Bend Test
How do you know when your ribs are ready? The bend test is a reliable indicator. Using tongs, pick up the ribs from the middle and observe how they bend. If they bend easily and the meat starts to crack slightly on the surface, congratulations, your ribs are perfectly cooked!
Step 10: Rest and Serve
Once your ribs pass the bend test, it’s time to let them rest for a few minutes before slicing. This step allows the juices to redistribute throughout the meat, resulting in maximum juiciness and tenderness. Now, slice the ribs between the bones, serve them up on a platter, and watch as the excitement and anticipation in your guests’ eyes grow.
Frequently Asked Questions
What are the best wood types for smoking ribs?
For a classic smoky flavor, hickory, and mesquite wood chips work wonders. For a milder option, consider fruitwood varieties like apple, cherry, or peach.
Can I parboil the ribs before grilling?
While some may opt to parboil ribs to reduce grilling time, we recommend avoiding this step as it can result in a loss of flavor and tenderness.
How can I prevent the ribs from sticking to the grill?
Ensure your grill grates are clean and lightly oiled before placing the ribs on the grill. This helps prevent sticking and ensures beautiful grill marks.
What are some alternative dry rub recipes to try?
There are countless dry rub recipes to experiment with! Try a Memphis-style rub with paprika, brown sugar, chili powder, and cayenne pepper, or a Kansas City-style rub featuring garlic powder, onion powder, and a hint of mustard.
Grilling ribs on a gas grill is an experience that brings joy, satisfaction, and mouthwatering results. Armed with the knowledge and techniques from this guide, you can confidently take on the challenge of cooking perfect ribs every time. So fire up that gas grill, select your favorite ribs, and let the flavors dance in harmony as you create a culinary masterpiece that will leave your guests raving for days. Happy grilling!