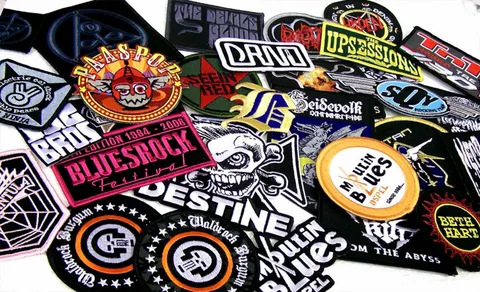
Everywhere you look, you see custom patches. Individuals are using them to personalize their essentials, while businesses use them for promotional purposes. It’s not like these badges flooded the market recently, but it’s only recently that people have started exploring their other uses besides fashion.
Whether you’re a person or a brand, it might be tempting to hop on the bandwagon. But here’s the thing: you can’t just dive into the world of emblems without learning about their fundamentals first. We have encountered many people making this mistake, only to end up disappointed and labeling patches “overrated.”
We don’t want you to fall into the same trap, which is why this blog will introduce you to the three basics of personalized patches. We’ll also offer some advice about creating patches on a budget, so stick around, as this guide can prove to be very helpful down the road!
The Three Essential Building Blocks Of The Perfect Personalized Patch
- The Size Of The Badge
Sure, having an idea of the patch size is important, but there’s more to it than meets the eye. You need to plan it carefully before you start to make sure it turns out just the way you want it. Your choice of patch size affects many crucial decisions.
For instance, certain patch materials work better with specific shapes and sizes. If you’re going for embroidered patches, it’s smart to go for a smaller size with a simple design. Keep text to a minimum because small crests can’t show detailed text well.
On the flip side, if you want intricate details and a complex design, you should consider woven or PVC labels. Actually, that’s the material most businesses prefer for such designs! So, picking the right patch size is a big deal.
- The Borders Of The Badge
A perfect patch requires more than a meticulous design. And borders are one of those essential aspects that you cannot ignore. If you don’t take the perimeters into consideration, you might end up with a patch that falls short of your expectations. Now, you have two border options here: merrowed and hot-cut borders. Let’s discuss them further in detail.
If we talk about merrowed borders, they are basically the standard style. That’s precisely what you’re going to get every time if you don’t specify your choice. These feature a raised edge around your badge. As a result, you can visually differentiate between the patch and the surface it’s attached to. Needless to say, it results in a classy look.
But since these borders are “standard”, they look better on basic shapes only. However, if you’re going after a customized shape, you might want to choose hot-cut borders. To create them, experts use a laser-cut machine. This ensures a precise cut and finishing, which would have been difficult to create otherwise.
Naturally, hot-cut borders take longer to create, and they are more expensive as well. But the results are well worth it if your personalized patches Dubai have a unique shape!
- The Attachment Method
How you’ll attach a personalized patch is the most crucial thing to think about when you’re ordering emblems. You need to consider factors like durability, wear and tear, flexibility, and more. There are various attachment options available, but here are the main ones to consider: applying heat, stitching, or using Velcro.
Let’s quickly go over how each of these attachment methods works:
- Applying Heat: If you’re looking for an effortless way to attach a patch, this method is your best bet. It’s as straightforward as it sounds. Just place the patch where you want it and use a hot iron.
But before you go ahead with this, there are a couple things to consider. Not all patches can be attached using heat. For example, avoid using this method for PVC and rubber emblems.
Additionally, it’s worth noting that this method may not provide the most long-lasting results. If you plan on using your badge frequently, you might want to explore alternative attachment methods.
- Stitching The Patch: This method does require a bit of sewing know-how, but it’s the most reliable way to attach a patch, making the effort well worthwhile. The process is relatively straightforward: just sew around the edges of the patch and through the garment it’s applied to.
It’s also important to ensure your stitches are tidy and evenly spaced. Additionally, you should use a thread that matches or complements the patch’s color for a seamless and visually pleasing result. The only downside is that once the badge is sewn on, it can’t be easily removed without damaging the fabric it’s attached to.
- Velcro Patches: We don’t normally use these types of crests for day-to-day use; they are a more common choice for organizations – particularly armed forces. These emblems are designed with a Velcro backing, which includes hook and loop fasteners. This feature makes it simple to transfer them between different garments with ease!
Creating Personalized Patches On a Budget: 5 Incredible Tips
- Use Fewer Colors: If you choose more colors, you’ll have to pay more – it’s as simple as that. When you’re finalizing your design, consider whether using so many colors is truly essential. If you can achieve the same result with fewer colors, opt for that to save some money.
- Opt For Simpler Designs: A detailed and intricate design will come with a higher price tag. Moreover, opting for elaborate artwork may not be the best choice, as such designs often struggle to effectively convey the intended message. So, keep the design simple and you’ll be able to save some money!
- Order In Bulk: You can enjoy a discount when you order patches in larger quantities. This is because many manufacturers provide reduced rates for bulk orders. So, if you’re ordering emblems for commercial purposes, be sure to order lots of them to take advantage of these discounts!
- Use Simple Shapes: The shape of the patch isn’t as crucial as the text and design it carries. Instead of opting for unique shapes, consider using simple geometric ones – they tend to be more cost-effective!
- Compare Different Vendors: This advice isn’t limited to just patches; it applies to everything. Never rush into placing an order with the first supplier you contact. Take the time to gather quotations from various manufacturers, compare their prices and quality, and then select the one that provides the ideal balance of both!
Key Takeaway: You’re Now All Set To Order Your First Batch Of Personalized Patches
When it comes to expressing your style or delivering a message, there’s no better way than personalized emblems. However, you can’t get it right as long as you don’t know the fundamentals of customized patches.
Thanks to this guide, you now have a solid understanding of everything you should consider before creating your first patch. Simply keep in mind all the valuable information you’ve gained from this blog, and you’ll be on the right path to designing a patch that checks all the boxes perfectly!


